ddn

David Dellanave

  • Blog
  • Programs
  • Coaching
  • Seminars
  • Contact

by david 17 Comments

Fix Your Squeaky SI Joint

Fix Your Squeaky SI Joint

This is a guest article by Doctor of Physical Therapy, Erika Mundinger, who gave a tremendous talk at The Fitness Summit in 2015 on how to deal with back pain caused by SI joint dysfunction. Her talk was one of the most popular of the weekend, and I knew this information would be helpful to other lifters and coaches so I asked her to put together an article for me. While there can be myriad causes of back pain, among experienced lifters it very often comes down to a lack of complete function in the SI complex, which these alternatives do a remarkably effective job at resolving. Hit us with the science, Erika…

It’s not news that 70-80% of the population has or will at some point experience dysfunction related to back pain. But back pain can come in many forms which can make dealing with it a bit tricky.  Somewhere between 15-30% of the people with back pain of these people will have either an accompanying sacroiliac joint (SI) dysfunction or an isolated SI dysfunction. This can range from a minor ache to a completely disabling. When it comes to lifting weights, having SI pain can be downright scary. I hear weekly in the clinic “I can’t work out until this goes away.” Unfortunately, what we need to help our clients understand is that not exercising will certainly not help in resolving back pain. It doesn’t “just go away and fix itself” as some may want to believe, or as they may have been misinformed from an outside source. Most often there is a faulty movement pattern that occurs through the pelvis that will keep the problem at a low level smolder that may be almost undetectable only to have to it come back again a week, a month, a year later. On the other hand, exercising incorrectly will often aggravate back pain, putting people in a bit of a catch-22.

So we have no movement aggravating symptoms, yet moving may aggravate symptoms.

So what do we do? Ignore it? Hope it goes away anyway? Push through it? No pain no gain?

Where’s the middle ground? There has to be a way for not just physical therapists, but also for trainers and coaches, to help clients exercise both around pain and to CORRECT the associated causes of the pain in the gym aside.

While the typical home exercise program that involves just piriformis stretching, foam rolling, and clamshells is effective, there are more effective paths a lifter can take. (Note: These are beneficial exercises for SIJ dysfunction. Stay tuned for part II with more on at-home self  maintenance exercises.)

First, it helps to understand how the SI joint moves mechanically.Sacroiliac_Joint

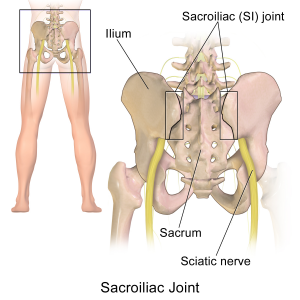
The SI joint and pelvis, like any other part of our body, moves on a three-dimensional axis. We can isolate each axis individually but for daily, functional movement, it moves simultaneously forward/back, side-to-side, and up/down. Think of walking for example. As one foot is forward the other foot is behind, the trunk rotates, the pelvis rotates, and one side will lift while the other side drops. Our muscles form “slings” around the pelvis working on longitudinal, horizontal, and oblique axes creating stability, also called force closure, from all directions.

Ok, so that sounds fancy and can get infinitely more complex if we were to break it down further. But what does this mean? In simple terms, to restore optimal mechanics in three dimensions it can help to train multi-planar movements.

How do I know it’s my SI, and not something else?

First, see your doctor. Typical SI symptoms will involve pain offset from the lower back, just above the hip and buttock. Pain will refer to the buttock, top of hamstring, and possibly around to the side of the hip. Symptoms will typically worsen with prolonged sitting, bending forward, bending forward and lifting heavy loads, and standing. Most people will feel better with walking and a bit of rotation. If this sounds like you, give these movements a try and see if you notice reduction in pain and better mobility. But again, these are “typical” symptoms and there is still variance from person to person. If symptoms are more localized to the spine itself, include pain shooting down the leg past the knee, or if you have numbness and tingling in to a specific area of your lower leg and foot, these may not be appropriate or productive exercises to try. And of course, if things aren’t improving, seek medical advice.

Without further ado, here are a few common exercises with correctional and rotational modifications to try with your current lifts.

Single Leg Deadlifts

Why it hurts:

This is a fantastic exercise to train the glutes, core, and hamstrings not to mention pelvic stability and balance. However, if we have a weak glute max and glute med, which is typically seen with SI dysfunction, the we get uneven closure of the SI joint from an unbalanced force locking system. We get excessive longitudinal pull through the SI without enough diagonal/oblique stability. The result is even more compression and shearing on an already painful joint.

The Fix: Single Leg Rotational Deadlifts

This exercise utilizes more glute med and piriformis than the single leg deadlift to help provide more uniform force closure. To perform this exercise, start with a kettlebell or dumbbell at the side of the foot, bend down rotating slightly to pick up the bell, and then stand up to a neutral position.

10 single leg rotational deadlift start

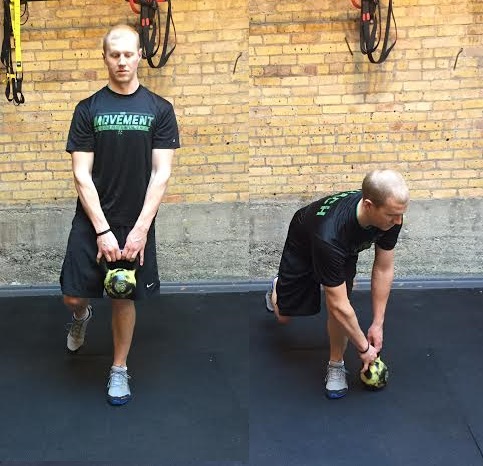
Please note, if you lack hip or spine mobility to comfortably twist to pick up the bell, or if balance is poor, elevate the kettlebell or dumbbell by placing a yoga block or a small step under the bell at the side of your foot so you don’t have to bend as far.  The exercise will still be beneficial and will prevent any straining.

This exercise can also be done on two feet if balance is poor.

Lunge

Why it hurts: As with the single leg deadlift above, this is a single plane movement that relies on glute max, glute med, and hamstrings. While EMG studies have shown that there is more glute med and max activation with the single leg squat compared to the lunge, looking at activation alone can be misleading. In a single leg squat there is higher activation of glute med than the lunge, but there is a much greater activation difference between working and non-working leg. The result is a force differential that is significantly greater across a system that is already lacking the function to stabilize opposing forces. In other words, the single leg squat is too stressful and looking at activation of one muscle in isolation can be misleading as to how it contributes to the system. The net result is that the lunge is a better exercise, but we need to make it activate more glute med than in a normal lunge pattern – that only exacerbates the singular plane problem.

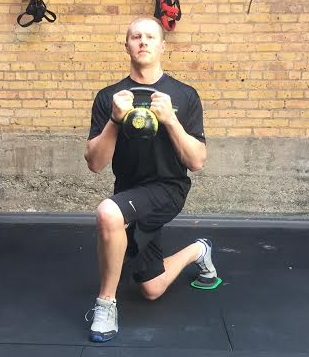
The Fix: Curtsy lunge

Similar to single leg rotational deadlift above, this exercise helps to activate more glute med and piriformis for SI mobility, not to mention the rotational movement of the exercise helps to retrain normal SI mechanics and rotation. Start with your foot on a Valslide, or furniture slider, or if on a hard floor have a towel under your sliding foot. As you slide your foot back, cross it behind you. As you stand back up think about engaging all the muscles around your hip to pull yourself back in to standing.
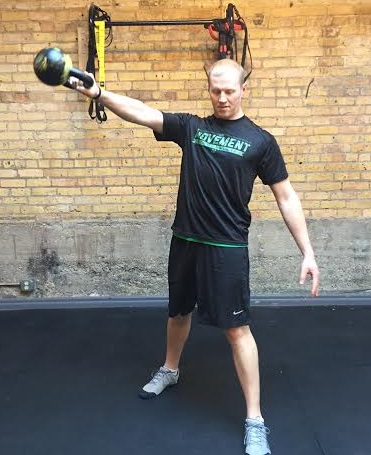
curtsy lunge

Kettlebell Swings

Swings are great for glutes, not to mention great for simultaneously getting a quick burst of cardio. But SI dysfunction sufferers tend to approach this move with a bit of trepidation and fear. This is one exercise I have heard clients at the gym commonly say “I wish I could do swings, but I always hurt too much after.”

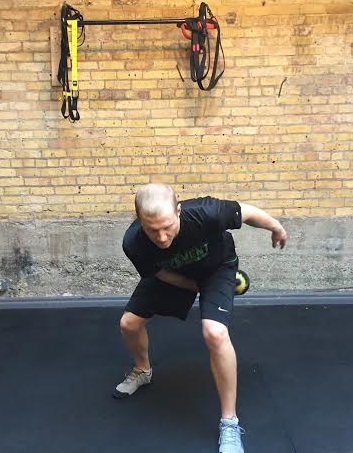
The Fix: One-Handed Lateral Kettlebell Swings

This motion utilizes the spine’s natural rotation and fires a ton of muscles along the diagonal planes, engaging the glute max and med, obliques, and lats to name a few. Stand with your feet slightly wider than hip distance and staggered with one foot forward and one foot behind. Grab the kettlebell in the opposite hand of the forward leg (so if stance is staggered with right foot forward use your left hand to swing the bell). Perform a one-handed swing keeping the torso pointed forward but allow the hips to rotate slightly following the bell at a 45 degree angle from midline.

KB swing startKB swing end

Fix Yo Biz

You may notice that when performing these movements that one side may feel easier on one side than another due to natural asymmetries and muscle imbalances. Also (disclaimer time) if you have limited rotation, be sure to start with low weight or no weight and focus on just doing the motion. Also never force more rotation than you can comfortably do. Starting with heavy loads or more rotation than available right off the bat with underlying dysfunction may exacerbate symptoms, but working through them with the focus on mobility can absolutely serve as a means to correct.

 P.S. If these tips are helpful to you, you might find these tips helpful as well which are based on the same concept of how the SI functions and what causes and fixes this type of back pain. 

Filed Under: Blog

by david 6 Comments

Powerlifting Attempt Selection for Not Dummies

Powerlifting Attempt Selection for Not Dummies

I recently coached seventeen lifters, the majority of whom had never competed before, through their first powerlifting meet at the Minnesota State Open. They all did very well, had a great time, no one got hurt, and most importantly to me completed more lifts than the rest of the field. This isn’t because they were necessarily stronger, which in most cases they weren’t, but because they chose their lifting attempts more wisely.

The successful lift rate for my lifters was ~82% versus 75% for the rest of the field.

JVB checks-in on her next attempt with me.
JVB checks-in on her next attempt with me. TJ Turner

Attempt selection is easily one of the biggest factors that will not only determine how well you perform overall in a meet but how much you enjoy the experience. Leaving a meet knowing you could have lifted a little more means you’ll be hungry and excited to do it again. Bombing out or missing a lot of lifts will make you feel like crap and ruin your experience. Missing that first squat opener will set the tone for the day.

Get to know your strength level intimately beforehand, and choose ALL your attempts before the day of the meet. This is critical. Don’t show up to the meet with a bunch of numbers in your head or even just your openers. During the meet decision fatigue will set in and you’ll find it harder to make smart decisions. Choose all your openers, and then “bracket” your choices for 2nd and 3rd based on if the previous lift went better or worse than expected. I cringe every time I see a lifter go up to the scoring table after their attempt and run their fingers up and down the conversion chart trying to decide what to do next.

Never, ever, ever miss your opener.

One of my lifters, Kate Gallagher, designed this super useful PDF template for laying out your lifts. Some of my lifters used a notebook, and some used this worksheet, but every single one of them had their lifts picked out before meet day.

pdf

How Much to Lift

1st Attempt: Your opener should be a weight you can lift 10 times out of 10 with a cold and a headache. In most cases it will be a weight you could do for a triple, and not in a best-case-scenario PR in the gym kind of day. Think of it like your very last warm-up rep under the exact conditions you’ll be competing in when you go for your two attempts that actually count. There is no reason to go for a 1st attempt weight that you would be satisfied with in terms of your total. If you only make your opener and miss your second and third attempt you should go home and think about what you’ve done and not repeat that mistake in the future.

Specific heuristics for each lift:

Squat 1st: This is your very first lift of the day and will set the tone. Consider being cautious and conservative.

Bench 1st: The data shows that the bench press eats lifter’s totals. Many, especially new lifters, make technical mistakes on this attempt. Guys especially who haven’t practiced with a pause tend to exaggerate their strength and are surprised how much harder a bench in competition is.

Deadlift 1st: My recommendation is to open at about 80% of your expected max lift. This leaves more in the tank for this demanding lift at the end of a long day.

Misses here: If you miss your 1st attempt due to a technical failure (a rules violation, not a failure to complete the lift) you should take the same weight again or the smallest possible increase (2.5kg). Missing this lift means your whole plan is out the window. I have seen people who miss and go up to their planned 2nd attempt bomb out of the meet all too often.

2nd Attempt: This is your first money lift and should represent about 90% of your maximum potential for the day. Making this lift but missing your third should still leave you with a solid total, but should NOT be a PR attempt or close to your predicted max. Don’t make this mistake of thinking that this is your first crack at a PR and the 3rd attempt gives you a second shot if you miss. Plan for success, not failure. If you have competed before, this attempt could be your 3rd attempt from the previous meet, depending on your progress.

Misses here: A full miss here puts you in a bad position for the 3rd attempt and will be extremely costly to your total. I’d recommend re-trying the same weight and hoping for the best. A technical failure on a completed lift puts you to a decision. You can go up to your planned 3rd attempt if you feel absolutely confident that you’re going to make it, but in my opinion you haven’t earned the right to go up by making your lift, so I would consider taking the lower end of your planned 3rd attempt.

3rd Attempt: Here is where you maximize the potential you brought on game day. This might be a small personal record, or otherwise 100% to 102.5% of your max. It’s not the “go for broke” attempt or the “pray that the crowd pumps you up and you put 50lbs on your max” attempt. Making this lift is what wins meets and increases totals.

Specific heuristics for each lift:

Squat 3rd: At this point in the meet you do not know what the competition is doing relative to you so it’s most important to execute your plan and make your lift. Get some feedback on how your 2nd lift looked from your coach and watch video to inform your perception. Sometimes a lift that felt slow flew up and it’s important to know when choosing your 3rd attempt. When in doubt go with a smaller jump. A lower white-lights lift adds more to your total than a miss at any weight.

Bench 3rd: By now you may have some idea who you are going heads-up with. If you are closely matched with someone else then it might make sense to be more conservative with this lift to ensure a successful lift. 3rd attempt bench presses tend to fail at an astonishing rate, so whatever you think you can do it’s pretty safe to say it’s probably a little bit less than that. In the meet I analyzed that had a large sample of lifters, 33% of 3rd attempt bench presses were successful. Part of this is technical failure due to rules violations, but part of it is just people grossly overestimating their actual strength. Know that a more conservative lift is more likely to add to your total.

Deadlift 3rd: This is the most strategically significant lift of the entire meet. You should know exactly where other lifters in your class stand and how the attempts will play out in the overall results. “If they make this, I need to make this – if they miss, I only need to make this.” It can be the difference between winning and losing, and due to the high-arousal and low technical skill of the lift it’s possible to pull out something you otherwise wouldn’t be capable of especially if you’re a lifter who excels under pressure. That being said, it’s still important to recognize your limits and execute your plan. If this is your first meet, I’d argue that regardless of the difference between winning or losing you should go with the attempt that you’re 95% sure you can make. However, a more experienced lifter might go with a slightly higher attempt (no more than 5kg) if it means the difference between 1st and second place, or winning and losing.

Final Thoughts

Aside from training properly and consistently to prepare, I don’t think anything has a bigger effect on your meet enjoyment and success than attempt selection. Your goal for every meet should be to go 9 for 9 and consider anything other than that a mistake that you should do everything you can to fix next time.

Don’t forget to have fun.

Filed Under: Blog

by david 1 Comment

Physically Cultured Challenge: Gripper for Reps

Physically Cultured Challenge: Gripper for Reps

I posted on my Facebook page earlier in the week about how grippers are quite possibly the best way to improve your grip strength for deadlifting.

Now, when I talk about grippers what comes to mind for many people are those junk grippers you find at Target or generic sporting goods stores. As with most things you buy at big box stores, they are junk. If you want something productive, you have to get a real tool.1.0x0

Torsion spring grippers, like the famous IronMind Captains of Crush series are popular and convenient ways to train the crush grip motion of the hand. They consist of a stiff spring connecting two all-metal handles, usually with significant knurling to keep the handles from slipping.

In barbell lifts the main gripping motion is the crushing action of the fingers, as opposed to any direct involvement of the thumb. If you can’t hold on a the weight, even with a mixed grip, it’s because your fingers aren’t strong enough.

If you want a stronger crush grip, grippers are the ticket. Get a range of grippers from one that you can close easily to one that is more challenging and requires you to start from a parallel set. Learning how to set a gripper is imperative.

Captains_of_Crush

Recently I travelled to Phoenix, Arizona on a skydiving trip and I took the opportunity to grab a lift with my good friend Bret Contreras. After we lifted, I challenged him to an impromptu gripper for reps contest.

Multiple rep training is a great way to build both strength and strength endurance in the hands, which is especially applicable to keeping that hand closed around your favorite barbell. You want a gripper that you can close without too much effort so that you can rep it out. You’re not going to do this with a max effort gripper.

P.S. If you need some hardware to get started, I highly recommend my friend and neighbor Matt Cannon’s online gripper store. To the best of my knowledge there is nowhere else you can get your grippers and get them rated in one fell swoop – something I highly recommend so that you know exactly what you’re working with. I explain this a bit more in the video as well.

Filed Under: Blog

  • « Previous Page
  • 1
  • …
  • 51
  • 52
  • 53
  • 54
  • 55
  • …
  • 81
  • Next Page »

Olive Oil

Upcoming Workshops

    No events to show

Search

David Dellanave

David Dellanave, known most often as ddn, is a lifter, coach, and owner of The Movement Minneapolis in the Twin Cities. He implements biofeedback in training; teaching his clients to truly understand what their bodies are telling them. He’s coached a number of athletes who compete at the international level in sports ranging from grip to rugby, and his general population clients readily demonstrate how easy it can be to make progress.

Latest Tweets

  • Just now
  • Follow me on Twitter

Copyright © 2025 · Generate Pro Theme on Genesis Framework · WordPress · Log in