ddn

David Dellanave

  • Blog
  • Programs
  • Coaching
  • Seminars
  • Contact

by david 1 Comment

How to Take a 16 Minute Nap

Little kids don’t even know how good they have it. Someone cooks them three meals a day, not including snack time. They get to take exciting trips to the park and the library. Just about everything seems like the most exciting thing they’ve ever done, and the moment doesn’t fly by them. Above all though, they get naps. Oh, the naps. Nothing makes me more jealous of kids than the naps they begrudgingly get to take.

Naps are the miracle supplement of healthy, productive people and societies. People on the island of Ikaria, a place where they seemingly forget to die, living measurably longer than people anywhere else on earth, take long naps during the day. Geniuses like Einstein are known to have taken short naps throughout the day, Einstein was said to have held a pencil in his hand until he dropped it – waking him up the moment he entered the deepest sleep. Dogs nap every chance they get, and they’re the happiest creatures on earth.c7e58a0c7abc11e2af5a22000a9f18fb_7

I’m not a genius, or an Ikarian, but I’ve been able to reap the productivity and energy benefits of short naps in only 16 minutes a day. It’s simple, but like anything worth doing will take a little time to master.

Here’s what you do:

  1. Set an alarm for 30 minutes.
  2. Darken the room as much as possible. I nap on the massage table at the gym, or on a couch. Beds are for sleeping at night.
  3. Get comfortable, and warm. Ideally the room would be cool, and you’d have a blanket or something warm to cover your body.
  4. Close your eyes and and let your thoughts go. In the first few minutes, you’ll be thinking about work, relationships, bills, and everything else. Let those thoughts go, almost in a meditative way until you fall asleep.
  5. When you wake up in a fog, wondering if you fell asleep, you probably already did. Get up immediately.
  6. If your alarm goes off, whether or not you were sleeping or even fell asleep you are done for the day. Go on with your day.
  7. Repeat daily, or even throughout the day if time permits.

Most people won’t even fall asleep the first few times they try this, but with a little bit of practice you’ll find that you fall asleep quickly, probably within five minutes of closing your eyes. As an added bonus, you might find that you fall asleep more quickly at night as well.

You will find that you wake up feeling incredibly refreshed. I nap like this about two times per week, usually when I find that my afternoon grogginess is limiting my productivity or effectiveness. Those moments when you’re at your desk and you feel like you could just close your eyes and go to sleep are perfect.

P.S. Combine with an espresso shot before the nap (caffeine takes about 30 minutes to metabolize) for maximum horsepower.

Filed Under: Blog

by david Leave a Comment

How I Smoke a Perfect Brisket

How I Smoke a Perfect Brisket

One of the undisputed secrets to good bar-b-que is time. In my estimation one of the other secrets is dry rub. Combine dry rub and time and you’re well on your way to good BBQ. I don’t know where I picked up this way of doing things but it has worked very well for me so I stick with it. The dry rub I use by far the most often is Dizzy Dust by Dizzy Pig. Hands down it’s the best all-around rub for pork shoulder, pork ribs, brisket, and even chicken that I’ve ever found. I have experimented with making my own rubs, but this is one thing where others can do it better in my experience.2016-03-18 20.04.25

  1. Apply your dry rub extremely generously. Use more than you think you should.
  2. Wrap the meat snugly in plastic wrap. Finish with rubber bands to keep it tight and keep contact on the meat.
  3. Put it in the fridge at least overnight, preferably over 24 hours.

Note that I don’t rub the rub into the meat by hand. Personally I don’t think this is necessary as the contact with plastic and time does more than you could accomplish on most of it, but if you like to get your hands dirty you’re certainly not going to do any harm by getting the rub into every nook and cranny.2016-03-18 20.29.14


I use a Big Green Egg (BGE) for smoking (and grilling, and some baking.) They’re kind of expensive, but in my opinion worth every penny. I’ve bought a lot of dumb toys and gadgets over the years and I consistently say this is one of my best purchases. My father-in-law has been getting great results with a Masterbuilt smoker that is about $250 on Amazon, a third of the price. That said, I have never regretted the purchase and the BGE has some major advantages.

2016-03-20 11.43.48
While the BGE is exceptionally good at maintaining temperature even in inclement weather, I use a piece of technology to ensure that on long overnight cooks I don’t wake up to a cold lump of charcoal and half-cooked meat. Or worse, that I don’t ruin or burn up a good piece of meat because the temp went too high. I use a device made by Rock’s Bar-B-Que called the Stoker. Basically it’s an Internet-enabled temperature controller that allows you to monitor the temp of the meat and control the temperature of the pit via a fan. It may not be “old school” but at this point I haven’t seen any pros not use a temperature controller, so I don’t have any qualms about this piece of technology. There are several on the market but I am loyal to the Stoker because it was the first to be Internet-enabled, is much more expandable than others, and has been rock-solid reliable for many many years. Their new models have WiFi, but I just plugged mine into a spare linksys to act as a bridge. (For the nerds in the house, it’s basically a Maxim TINI and the sensors are 1-wire bus sensors. It predates Arduino by at least a full generation.)

Doesn't really look like it in the photo, but smoke is pouring out.
Doesn’t really look like it in the photo, but smoke is pouring out.

I usually start the brisket cook at 225ºF. This time I tried starting at 205 and then kicked it up to 225 after a couple hours. I don’t expect it’ll have much impact, other than on timing when it’s finished. For smoke I’ll usually use hickory chunks as I favor the sweeter, lighter smoke flavor that it imparts. I’ve used mesquite in the past but I tend to grab the hickory more often. Once the charcoal has burned off the initial smoke and the fire stabilizes at the cooking temperature I’ll add 5-6 chunks of wood. I try to place them somewhat strategically so some will burn right away and others will burn later on as the fire moves through the lump. Opening the lid and doing this will throw the temp off for a bit but it’s not a big issue as you’re putting a refrigerator-cold piece of meat in there anyway. I use an inverted ceramic “plate setter” to hold a drip tray which I usually do not fill with any liquid. Some people think adding cider or something to this will add moisture to the meat – I doubt it. I just want to catch the fat drippings so it’s not dropping on the coals and imparting a burned fat flavor.

Put the meat on, and now you wait.

2016-03-20 11.46.32
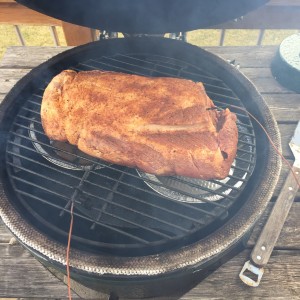
One of the big advantages of a temp controller is that you never have to open the smoker to check anything. Keeping the lid closed keeps the temp stable and the smoke in. It’s not a cheap addition to your setup, but it’s worth it for the peace of mind and consistency.

Timing with these big chunks of meat can be tricky if you don’t have a lot of experience. With brisket I plan on about 1 hour per pound, more like 1.25hours/pound if it’s a big one like this 7 pounder. Pork butts I plan for about 24 hours.

But here’s the key: don’t try to time it to be done right at eating time because you’ll get it wrong and then everybody will hate you because you’re eating hot dogs with all the great sides instead of brisket or pulled pork. Unless you have a ton of experience and you know how long it’s going to take, do what the pros do: start earlier and then wrap it up in tin foil and a layer of dish towels when it’s done and put it in a cooler, your poor man’s Cambro. The cooler will keep the temp safe for serving AND keep the meat hot and moist. When it’s time to serve, pull it out and slice (or pull).

Here’s another great reason to have a temp monitor/controller: At some point during the cook your meat is going to hit a temperature plateau that it won’t break through for hours and hours – folks call this the “stall”. I used to believe that this was a magical time during which unicorns blessed the meat with tenderness and fat by converting collagen. I have since been disabused of this notion and it changed my BBQ cooking for the better. Rather than a co2016-03-20 19.29.15
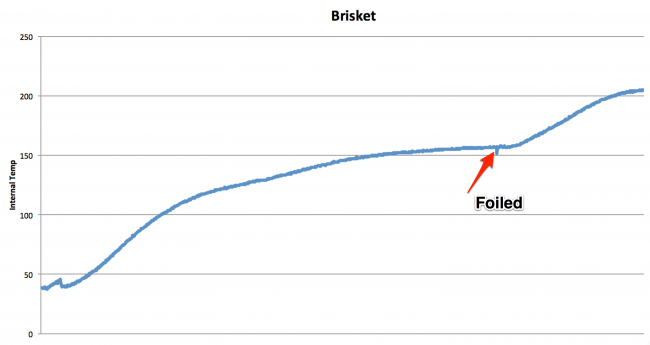
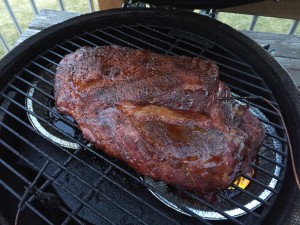
nversion process, all the plateau is is the point at which evaporation of the water in the meat reaches an equilibrium with the low-temperature cooking and results in an almost constant state of evaporative cooling until you run out of water in the meat. Not great. Now, after several hours in the smoke when the meat hits a plateau (around 155ºF) I wrap it in aluminum foil for most of the remainder of the cook. This does two (well, three) things that are beneficial: you retain more water and moisture in the meat, you get a good cup or two of delicious juice to pour over the meat later (I happen to know that some fancy chefs dip their brisket in beef stock before serving to make it more juicy), and it usually signals that you’ll be done cooking in no more than a couple hours. Depending on timing I will sometimes kick the heat up to 250 or 275 at this point to speed things up as you’re not going to hurt the meat at that point.brisket
I pull it off between 195 and 205 and then let it rest for at least 20 minutes, if it’s not going into the cooler. Finally, slice it up. There are entire articles on how to slice a brisket, and I don’t get too fancy about it. This time I sliced the point off the flat and sliced that separately.2016-03-20 22.31.342016-03-20 22.32.59

As with anything, the more you research and the more you practice the better you get. This method is my amalgamation of what I’ve learned and observed as best practices. It may not be perfect, but it produces some damn fine bar-b-que.

Filed Under: Blog

by david 2 Comments

Three Ways to Use Biofeedback Training

Three Ways to Use Biofeedback Training

When people are first introduced to biofeedback training it can be easy to get overwhelmed and have it seem like something that would be nice to implement in their training but feel like it’s too complicated. It’s not, and I’ll lay out exactly how you can use it.

There are three major ways that you can implement biofeedback testing in your own training:

The first is to use it as a way to supplement your intuition and confirm a hunch. This would work best for people who already have a high sense of intuition about what they’re feeling in their body. You know when you feel that something is “off” and maybe even you have a good sense for what to change to make it feel right. In this case you can use biofeedback testing as a way to confirm or deny your hunch. Maybe you’re feeling a little off but you don’t know if it’s “in your head” or if it’s a real sensation – biofeedback can objectify that sensation for you and tell you if it’s accurate.

The second and most common way to use biofeedback training is to test out your major exercises and components of your program. This is a super flexible approach and lets you use an existing program for guidance without the downsides of sticking to a rigid prescriptive program – namely doing things that your body doesn’t react well to. This is the approach I advise most people to use when they first get started with biofeedback training. To implement this, simply test the movements in your program before performing them. If your first exercise of your program is a conventional deadlift then you would perform that movement and test it with biofeedback. If it tests well, then you go ahead with your program as usual. Believe it or not, in most cases this is exactly what happens. In the even that it does NOT test well you would then try some alternatives and make some tweaks to the program that day. The next day you very well may go right back to the program as written. Of course beyond testing exercises in the program it would be best if you also tested the weights or loads you were using, but each individual is free to adjust how much testing they want to do based on their own needs. I’ll circle back on the topic of how much testing to do at the end of this article.

Finally, the most thorough and intensive way to use biofeedback is to test everything. I call this going down the rabbit hole. In my experience this is most appropriate for people have a significant number of movement issues and or are dealing with chronic pain issues. These people can handle the least amount of distress from training, so they have to find that narrow slice of eustress that the right movement, with the right tool, the right load, and the right volume will engender. Naturally this is more time consuming to test so many more variations but it’s really necessary for people who can’t follow an inherently more stressful pre-written program.

Which Is Right For Me?

In my experience and opinion the best way to get started with biofeedback training is to start in the middle and move in the direction that makes sense for you. Most people with experience strength training are already accustomed to using or following a program. Applying biofeedback to a program is really simple, I went into this in detail in this article, and is not a big stretch from what you’re used to. Plus, if you’re using a well-designed program you are going to be able to reap the benefits that it’s designed to provide but calling audibles whenever necessary to keep things moving in the right direction gives you the best of both worlds. If I had a dollar for every time I heard of someone rigidly following a program getting hurt I would have a sad retirement on a private island of broken training dreams.

From there, you can move in one of two directions. If you’re super healthy, functional, and pain free and you have developed a good sense of intuition you can get away with a lot of training without actually testing – just paying attention to that intuitive sense of how things feel. When necessary you can use biofeedback to confirm your intuition.

For some people however, those who are experiencing ongoing pain issues, testing more and more becomes critically important. In these cases you sometimes have to get very creative in thinking of new things to test and finding exactly what works for your body so you can move where you can today.


Filed Under: Blog

  • « Previous Page
  • 1
  • …
  • 47
  • 48
  • 49
  • 50
  • 51
  • …
  • 81
  • Next Page »

Olive Oil

Upcoming Workshops

    No events to show

Search

David Dellanave

David Dellanave, known most often as ddn, is a lifter, coach, and owner of The Movement Minneapolis in the Twin Cities. He implements biofeedback in training; teaching his clients to truly understand what their bodies are telling them. He’s coached a number of athletes who compete at the international level in sports ranging from grip to rugby, and his general population clients readily demonstrate how easy it can be to make progress.

Latest Tweets

  • Just now
  • Follow me on Twitter

Copyright © 2025 · Generate Pro Theme on Genesis Framework · WordPress · Log in