
Long before someone decided to call standing on an exercise ball like a circus penguin functional training, there were movements that served legitimate functions and purposes. Let’s face it, a squat might be a fantastic exercises because of the tremendous muscular recruitment throughout the whole body – but how did the weight get there? You stepped into a specially manufactured cage, with the weight already in place, and took it upon your shoulders.
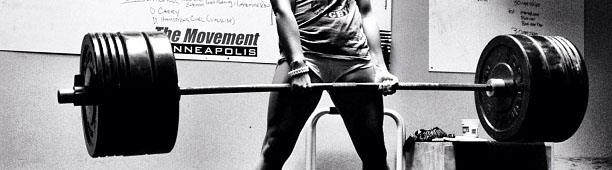
Barring the use of a squat rack, you’d have to get the weight there in the first place. Enter the Steinborn Squat. This movement was named after Henry “Milo” Steinborn, who was known to take a bar loaded to over 500lbs from the ground, tip it onto the back, and squat it for repetitions before placing it back on the ground the same way it came.
Shortly after I started practicing this movement, one of my clients, who is a tradesman, pointed out that this is exactly how they would hoist several-hundred pound bundles of steel rebar onto their backs to carry it. Talk about functional exercise.
But there are few exercises that will rustle the jimmies of uninformed onlookers like the Steinborn Squat. Do this in a commercial gym and you’re virtually guaranteed to have a manager ask you to sign an additional liability waiver.
The Steinborn Squat appears to be the holy trifecta of spine-exploding madness. You’ve got heavy weight, a bending spine, and MOVEMENT! Surely you’d be cruisin’ for a bruisin’.
Here’s the deal. The body can move in more ways than we can count. That includes the spine. No one looks at a Cirque du Soleil performer and assumes that they’re going to be in a wheelchair in the next moment because they’re moving, bending, flexing, twisting, and extending their spine. As soon as weights get involved, the whole mindset changes.

Here’s where the real problems happen:
- When you don’t move the body in a way it can move.
- When you move the body outside of its limits.
I help a lot of people get out of back pain. I’m not going to load a bar to 225 and ask them to Steinborn it the first day they walk in my gym. Within the first month, however, I miiiiight have them test out a Steinborn Bend (part of the progression I’m going to teach you) to reintroduce a movement to their body they are lacking.
Likewise, my spine isn’t going to shoot out my ass because I’m doing a 300lb Steinborn any more than yours is when you do a deadlift with perfect form and a neutral spine.
Capisci?
Enough! Learn It:
At The Movement Minneapolis, we’ve developed a bit of a teaching progression for the Steinborn. Not because it’s important that everyone learn to do it, but more because certain components of it can be useful without doing the whole thing – and then some people want to learn the whole thing.
Prerequisite: You should be able to squat your body weight on a bar, with good form, to below parallel. If you can’t do that, proceed at your own risk. Actually, proceed at your own risk anyway.
Steinborn Bend
The Steinborn Bend is a movement we came up with that teaches the deep squat lean or bend that is the primary movement in the Steinborn. We have people start out with a PVC, and move up to a bar or more.
- Put the bar across your back.
- Drop into a deep squat, as deep as you possibly can.
- Tip the bar to the side, touching the end of the bar to the floor if possible.
- Return to an upright position, and then repeat on the opposite side.
- After finishing all your repetitions, stand back up with the bar.
Anderson Squat
The Anderson squat is a variation in which the bar starts out on the pins in a power rack, you set up in the bottom of a squat position, and then stand up with the bar from there. It’s similar to a box squat in the sense that there is no stretch, and no eccentric component of lowering with the weight before reversing direction. You are required to produce force from a “cold” start. The exact height you start from will depend on you, your squat, and the weight you intend to use. Play with it.
- Set a power rack to a height where the bar will sit somewhere in the range of the bottom of your squat position.
- Wedge yourself underneath the bar into your bottom position.
- Drive the weight up to lockout.
- Lower the weight back to the pins under control. Rest for a second or two to allow all the elastic reflex to dissipate, and then begin your next rep.
Steinborn Squat
The moment you’ve been waiting for. You’re going to back squat, without the user of a squat rack. Never again will you be frustrated by someone curling in the squat rack. Let’s go over the basics, then I’ll cover some tips from experience.
- Place a loaded barbell on the floor. Rubber matted floors work well so that the bar end doesn’t slip, otherwise you might need something to shove the end of the bar into so it doesn’t slide. Grabing the free end of the bar with both hands, upend it so that one end is on the ground, and the other is nearly vertical, supported by you.
- Place your left hand roughly on the power ring closest to the ground, and the right hand on the power ring closest to the ceiling. The bar will be to the left of your body in this position.
- Bend over, positioning yourself roughly in the center of the bar, with it tilted at a slight angle to vertical, and the bar running across the top of your upper back just like you would have it in a back squat.
- When you’re ready, drop your hips and butt, thereby lowering the bar towards you. When the bar is straight across your back, and parallel to the floor, stand up. Do this slowly and deliberately at first.
- Perform squat repetitions.
- Reverse the movement to return the bar to the floor under control. Dump it off your back if you have bumper plates and you’re a sissy.
Here are some notes from my experience:
- There is a trade-off between squatting deeper to make it easier to tilt the bar over, and making it harder to stand back up. Find the sweet spot where you aren’t getting buried by the bar, but you can still get the bar tilted on to your back. If you can stand up from the very, very, very bottom of a squat with heavy weight then good for you. Let that sumbitch bury you, and do your thang.
- The speed at which the tilt, “catch”, and initial standing up from the squat occurs will vary based on your strength and the weight you’re attempting. Ideally, you’d take advantage of as much stretch reflex as possible, and rebound from the weight coming down right up into lockout.
- You can “pull” down on the high end of the bar to lever it onto your back, rather than relying completely on the bend in the torso and a deep squat to allow the bar to reach parallel in the back squat position.
- Play with your hand position, and the position at which you “lever” the bar. Hint: dead center of the bar maybe not be the strongest position.
- Move your feet around in step 3 and 4 to find good leverage. Hint: dead symmetrical definitely is not the best position.
Fear Not
Armchair experts on the Internet love to fear monger about how if you move the body in any other way than what they deem to be acceptable it’s going to explode. Work within your limits, but explore your capabilities and find out what is possible. You can do some pretty amazing things.

 So, of course, I sat out to make them this weekend. We picked up a few of the last local strawberries from the Farmer’s Market and I went to work. The good news is they’re very easy to make, and taste fantastic.